As an IT professional, you tin make a few Windows ten performance tweaks to help the OS to run faster.
These 11 tips y'all should learn are mostly simple and easy fixes. If these options don't solve your operation issues, and then yous may need a more comprehensive root-cause analysis of your managed desktops.
ane. Check for the latest Windows update
Microsoft provides two main categories of updates: Feature updates, which Microsoft releases biannually and include major new features, and Quality updates, which accost security breaches, known bugs and other troubles with Windows x.
These updates exercise occasionally cause their own issues that you may need to address, so you should await into whatever known bugs and bug with the latest Windows builds. This could exist the root of your Windows 10 performance problems.
Conversely, the upshot could be that you oasis't applied the latest Windows ten update. You should stay up to engagement with the latest updates whenever possible, subsequently testing them, and stay up to date on the latest known issues and bugs with each Os version.
two. Minimize the paging file
The Windows paging file, or pagefile, is sometimes called Windows 10 virtual memory. It supports system crash dumps and enables the organization to utilise physical RAM more efficiently by writing some file content to a hard disk if the main memory is near capacity.
On most Windows 10 systems with 8 GB of RAM or more, the Os manages the size of the paging file nicely. The paging file is typically i.25 GB on viii GB systems, 2.five GB on 16 GB systems and 5 GB on 32 GB systems. For systems with more RAM, you can brand the paging file somewhat smaller. You could trim the paging file to 2 GB on a xvi GB system, for case, or to 3.5 GB on a 32 GB system without running into any noticeable operation problems.
Equally a upshot, one of the Windows 10 performance tweaks you tin make is to reduce the size of the paging file on such systems. You should avoid altering the paging file on 32-bit systems, however.
You can minimize the size of the paging file using the following steps:
Open System Backdrop. Right-click the Start button, select Command Console > Organization then click Change Settings.
In the System Backdrop dialog box, in the Advanced tab, click the Settings button in the Functioning
In the Performance Options dialog box, in the Avant-garde tab, click the Change button in the Virtual Memory
In the Virtual Memory dialog box, jot down the minimum allowed, recommended and currently allocated paging file sizes in the last section. Then, uncheck the box that says Automatically manage paging file size for all drives. If more than than i drive appears in the available drives list, click your arrangement drive, which is the one you installed Windows ten on -- normally C:.
Click Custom Size, and and so type values into the Initial Size (MB) and Maximum Size (MB) Make the maximum size ane GB or upward to 4 GB, depending on the corporeality of RAM y'all installed -- 64 GB or more.
Click Ready, then OK.
After these steps, close all the open dialog boxes and restart your reckoner.
If y'all take multiple physical drives -- non just multiple partitions of a single drive -- you lot tin increment the arrangement speed by splitting the paging file beyond ii drives. Allocate about 300 MB of the paging file to the organisation drive, select the second bulldoze in the Virtual Retention dialog box, set up the initial size and maximum size values, and click Ready.
iii. Apply ReadyBoost
Microsoft ReadyBoost is a Windows feature that offers a basic disk caching utility. This utility tin can cache files with a removable flash-based bulldoze to better Windows 10 performance without requiring boosted memory.
The requirements for this feature are the following:
1 millisecond or less admission time;
75 MBps throughput for random writes of 1 MB;
At least 64 KB of available storage; and
5 MBps throughput for random reads of 4 KB.
To employ this utility, you should attach the removable bulldoze to the device, correct click it in the Windows 10 File Explorer and cull the Properties option. Then, you should select the ReadyBoost tab and click OK. If the drive is not compatible with ReadyBoost, the tab will not appear.
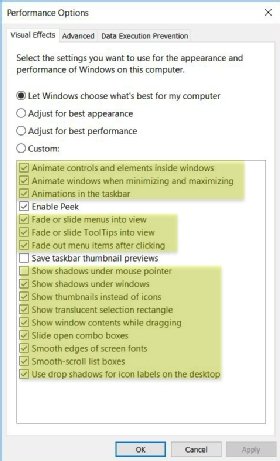
Figure 1: Disable visual furnishings in Windows 10
4. Disable visual effects in the UI
Desktop animations and shadows in the background brand the UI look great, but they tin eat significant CPU and memory.
To turn off these features, open System Properties. In the System Properties dialog box, in the Advanced tab, click the Settings button in the Performance section. In the Visual Effects tab, you can uncheck all the options highlighted in yellow (Figure 1).
5. Free upward deejay space
Other Windows 10 performance tweaks, such as turning off unneeded system services, tin can speed up the Bone. Yous tin can safely disable services such as ASP.Cyberspace State Service, Portable Device Enumerator Service and Windows Media Player Network Sharing Service.
Even though Windows 10 versions since 1607 haven't benefited much, if at all, from service preparation, with underpowered 32- or 64-bit systems, disabling some services tin even so provide a modest performance boost.
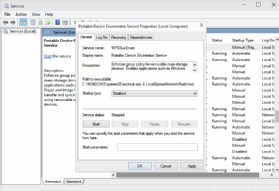
Effigy two: Follow these steps to disable a service in Windows x
To disable services, open the Services console by entering services.msc in the Run box. Correct-click the Start bill of fare and select Run, or printing WinKey + R. In the Services console, right-click the service you lot want to plough off and select Backdrop. In the Backdrop dialog box, click the Stop button and so select Disabled from the Startup type drop-down menu (Figure 2).
Be certain to disable one service at a time, reboot the figurer and apply it for a while before disabling another service. This fashion, if something goes haywire, you lot'll know which service you must enable again to gear up the trouble.
6. Clean and defrag your hard disk
This tip can merely help Windows 10 desktops with a hard disk drive (HDD); desktops with a solid land drive (SSD) tin can't benefit from this Windows direction method. With that in heed, y'all can run the local defragmentation and disk cleanup tool to optimize the desktop'south HDDs. Defragmentation is the process of rearranging files on a bulldoze to make them easier for the organization to admission.
To run a defragmentation on your desktop's HDD, navigate to organisation settings and click on the Storage tab. From there, y'all should select the Optimize Drives option. And so you lot should click on the HDD and select the Optimize command. The tool handles the rest of the defrag task from at that place and will reorganize the bulldoze to make indexing less resource-intensive and delete any unnecessary temporary files.
seven. Disable startup programs
Whittling down the programs that launch automatically when Windows 10 starts tin can get you lot from the power-off state, or a restart, to the desktop more than rapidly. To manage Windows x startup programs, open up the Job Director and click the Startup tab. Select the programs you lot don't desire to launch automatically and click Disable. If you really desire to get down and dingy with startup items, use the Windows Sysinternals Autoruns utility instead.
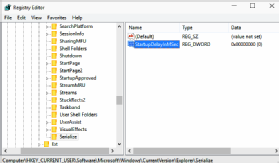
Figure iii: Adjust the app startup delay in the Windows Registry
Windows 10 too has a built-in internet lookup for process names, which makes it easy to decide which processes to get out enabled and which ones to disable. To use the internet lookup, right-click whatsoever entry and select Search Online. Your default browser opens with a list of results for that particular program.
At Windows 10 startup, apps that the Startup folder loads are delayed to allow the OS to load its processes first, which keeps things orderly and makes for a speedier experience. You can reduce startup time even more than past minimizing the app startup time delay, which requires using the Windows Registry Editor:
Open the Registry Editor -- exe.
Drill down to the following registry cardinal: HKEY_CURRENT_USER\Software\Microsoft\Windows\CurrentVersion\Explorer\Serialize. If the Serialize key does not be, create it by clicking the Explorer key in the left pane, selecting Edit > New > Fundamental from the carte du jour bar, typing Serialize to name the primal and pressing Enter.
Create a new DWORD value chosen StartupDelayInMSec and set the value to zero. To create the DWORD value, correct-click the Serialize key in the left pane and select New > DWORD (32-chip) Value. Rename the value to StartupDelayInMSec. The value is set to zero by default as shown in Figure 3.
Exit the Registry Editor.
The next fourth dimension you reboot, your reckoner should first up faster.
8. Reduce the boot delay timeout value
In Windows 10 the boot filibuster timeout value is ready to 30 seconds by default. Yous can find the boot delay timeout value in the Boot tab in msconfig.exe.
You tin add to your Windows 10 performance tweaks past reducing the boot fourth dimension value to 10 seconds -- which still leaves plenty fourth dimension to boot in Safe Style if you need to. Alternatively, yous tin can gear up it to cypher seconds and use msconfig -- the Boot tab -- or Settings > Update & Security > Recovery > Advanced Startup to force Windows x to kicking in Safe Style on the next restart.
The Settings method forces an firsthand restart, then don't do this until you relieve your work and are prepare to reboot. The msconfig method requires you to uncheck the Safe boot checkbox before your next reboot.
If you implement all these Windows ten performance tweaks to reduce startup times and increment retentivity, you should observe a much faster operating system. Even a few of the recommendations will earn y'all a more than responsive and enjoyable computing experience.
9. Alter power plan
Microsoft offers iii power plans with Windows 10 systems, and each of them are helpful in dissimilar use cases. Power saver mode, for instance, maximizes battery life at the toll of performance. On the other hand, High operation way maximizes the desktop'southward functioning at the cost of energy utilize or bombardment life, depending on whether your endpoint has a connection to a power source. In that location is also the option to run the Balanced power plan, which Microsoft recommends.
If you are having performance issues with Windows 10 desktops, it may exist worthwhile to enable Loftier performance way. To enable this ability plan, you should open the Control Console, and and so select the Hardware and Audio tab. From at that place, click on the Power Options category, and from there you can select the High operation plan, or whichever programme you'd prefer.
ten. Remove viruses and malware
This may exist an obvious concept; you should always avoid viruses and malware at all costs. You likely accept an existing antivirus and antimalware programme, and the best advice is to follow your existing procedure to scan the Windows x desktop for viruses, malware or whatsoever unwelcome software that could exist causing bug.
Desktop animations and shadows make the UI expect great, simply they can consume pregnant CPU and retentivity.
If you don't have an existing antivirus platform, then y'all can use Microsoft'south native Virus & Threat protection tool, Windows Defender. You can run a scan past navigating to the Windows Defender Security Center carte, and then select Scan options. This volition prompt the Windows Security menu to provide iv options.
While each of these options take their merits, the Full browse is the most consistent pick, but y'all can also prepare a Custom scan to meet your organization'due south needs.
11. Upgrade your hardware
Maximizing the amount of concrete RAM can dramatically improve Windows x performance. A 32-bit system running Windows ten can adjust up to 4 GB of RAM, and a 64-bit organisation can handle 128 GB or more, depending on the version of Windows 10 you install and your estimator's motherboard.
Retentiveness modules are inexpensive, then consider installing the maximum 4 GB of RAM on a 32-chip organisation and at least 16 GB on a 64-scrap arrangement for everyday use. You should too purchase the fastest RAM that the system will support. Bank check the computer or motherboard manufacturer's specifications.
Which Tool Would You Use To Configure The Paging File Location And Size On A Windows System,


0 Response to "Which Tool Would You Use To Configure The Paging File Location And Size On A Windows System"
Post a Comment